How to Make Really Easy Homemade Instruments
Most of us buy musical instruments, but ever wondered how to make musical instruments with recycled materials?
If you have, you've come to the right place.
In this article, we've put together a list of homemade musical instruments made from recycled household items that you and your little one can make.
Not only is making recycled instruments fun, but it will teach them a little about living sustainably too (a win-win!).
Table of Contents
- Things to Hit
- Balloon Drums
- Bongo Drums
- Spool Drums
- Chinese Gong
- Paper Cymbals
- Things to Shake
- Pringles Can Shaker
- Plastic Water Bottle Maracas
- Paper Plate Maracas
- Easter Egg Maracas
- DIY Tamborine
- Tubular Bells
- Rain Sticks
- Music with Glasses and Bottles
- Xylophone
- Bottle Top Castanets
- String Instruments
- Rubber Band Guitar
- Mini Lid Banjo
- Homemade Brass Instruments
- Bracelet Bells
- Jingle Wand
- Washer Chimes
- Homemade Wind Instruments
- Card Kazoo
- Popsicle Harmonica
- French Horn
- Viking Horns
- Zampoñas (Panpipes)
- Homemade Didgeridoo
- Pianos and Glockenspiels
- Thumb Piano
- Copper Glockenspiel
- Summary
Things to Hit
Let's start off our list of DIY musical instruments with some types of drums you can make from everyday household items.
Balloon Drums

Take any old tin, mug, or saucepan you have in the cupboard, a deflated balloon, and an elastic band. Cut an opening into the balloon at its widest point making a semicircle-shaped incision.
Now rinse the balloon with water, so that it sticks and stretch it over the top.
If necessary, tape the edges down to hold it in place, but an elastic band should do the trick. Get the kids to hit the balloon skin with a wooden spoon or chopstick to make a drum beat.
To jazz things up, have your kids paint the outside in bright colors for an extra fun look. More info…
Bongo Drums

Take two round crisp or coffee containers, with their plastic lids still in place.
Get the kids to decorate them using paints, crayons, stickers, or glitter to jazz things up a little. Next, put the containers next to one another and tie both together with string, making sure both are secure and don't wobble.
Glue the string into place and wait for it to set. Children can play with the bongos using their hands, teaspoons, or chopsticks. More info…
Spool Drums

Kids swizzle these spool drums left and right, pretty looking things aren't they! They're way too complicated to explain how to make them here, check out the instructions here.
Chinese Gong

This is a fantastic way to get children involved in music from different cultures. To make your own Chinese gong, make two holes in a tin-foil roasting tray, making sure they lie about 2" apart from each other.
Next, take two pipe cleaners and feed each through a separate hole, making sure to twist them into a circle to seal them in place. You can place a cardboard wrapping paper tube or a stick through the holes and fasten it to a couple of chairs so that it hangs.
Finally, get the kids to decorate the gong using Chinese symbols and hit it with chopsticks or a wooden spoon to create music! More info…
Paper Cymbals

If you're wondering how on earth you can craft some DIY cymbals at home, the answer couldn't be more simple. Use pan lids!
Everyone has a pair of these sat in their cupboard and kids love to crash them together to create music. If you don't want your pots and pans getting bashed around, why not try making a set of cymbals from two paper plates and coins around the edge? More info…
Things to Shake
If you're looking to create something slightly less noisy than a set of drums, why not try making something your child can have fun shaking about? Here are some of our favorite DIY 'rattle' homemade instruments.
Pringles Can Shaker

Take an empty pringles container and cover the outer surface with paper or masking tape, making sure to leave space for the lid to attach properly.
Then get the kids to paint or draw around the outside with bright colors and to stick on some foam shapes to make the shaker look extra special.
Take off the lid and add a handful of dried beans or rice to the container, seal it again, and shake to enjoy! Different beans, rice, and pulses make different sounds, so try making a set with different fillings in each, so your little one can experiment with different sounds. More info…
Plastic Water Bottle Maracas

Find a couple of used water bottles and clean and dry them. Wrap masking tape around both and get the children to color them in or paint them with bright colors.
Now, fill the bottle halfway up with popcorn kernels, rice, or dried beans and secure the bottle top. Start shaking to enjoy!
Different sized bottles and pulses will create a variety of sounds, so why not try making a set of maracas in different sizes and letting your kids listen to the variety of music they make? More info…
Paper Plate Maracas

Take two paper plates and place them eating side down. Ask the kids to paint the side facing them and to add glitter or colorful cardboard shapes to brighten things up.
Let both dry and flip one over to expose the non-colored side. Place dried beans or rice onto the plate, then take the other paper plate and put it on top of the other. Carefully glue around the edge and leave to set.
Once dried, you have a fully sealed, paper plate maraca! You can try creating a set containing different fillings, so your kids can experiment with different sounds.
Easter Egg Maracas

Just when you thought Easter couldn't get more exciting, we've thought up a fun way you and the kids can make Easter egg maracas as well as eating loads of chocolate.
To make these you'll need some leftover plastic Easter egg shells, popcorn kernels or rice, masking tape, and plastic spoons.
Start by partially filling an egg with popcorn kernels and sealing. Next, take two spoons and tape them to either side of the egg, then tape the ends of the spoons together.
Last but not least, get the children to decorate the tape in bright colors, shake and enjoy! More info…
DIY Tamborine

Paint the non-eating sides of two paper plates in bright colors of your child's choice. Allow them to dry, then stick on any fancy shapes and add glitter to make them extra fun!
Next, glue the edges of the plates together, so that both eating surfaces are enclosed and only the non-eating surfaces can be seen. Leave the glue to set. Then, use a hole-punch to create holes 2" apart around the edge on the plates and thread a piece of string with a bell attached through each. Shake and enjoy! More info…
Tubular Bells

This is a really easy way for younger children to make a fun instrument at home.
Get a cardboard tube, from either a pack of kitchen roll or gift-wrapping paper, and cover it in plain paper. Ask the kids to decorate it how they like, then pierce several holes in one end of the tube.
Feed some string into each hole and attach a bell. Now tie a knot to seal in place and repeat until all the holes have a little bell attached to them. Shake and rattle to enjoy! More info…
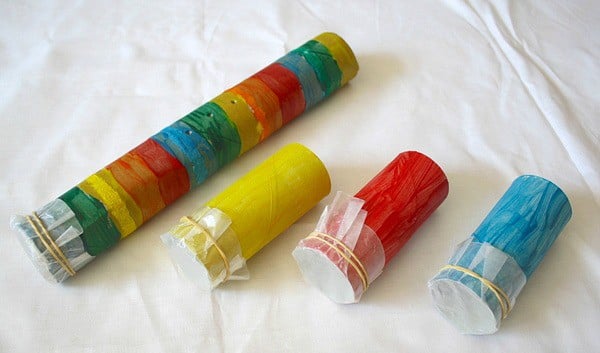
Rain Sticks

To make a rain stick all you'll need is a piece of plastic tubing about 30cm long, some tin foil, rice or dried beans, and some tape.
To get things rolling, tape up one end of the tubing, making sure there are no gaps. Now feed a piece of tin foil into the tubing, this should ideally be the same length as the tube.
Next, fill the tube partially full with rice, dried beans, or beads and tape up the other end. Kids can turn the stick at 180 degrees and listen to the sound that the filling makes against the tin foil. More info…
Music with Glasses and Bottles
Xylophone

To create your very own DIY xylophone you'll need a set of glasses or jars and a wooden spoon.
Fill each glass with different amounts of water, starting off with very little and ending with the glass nearly full. Ask the kids to gently hit the glass with a wooden to hear the subtle difference in notes.
Remember, glasses with less water will produce a higher pitch, whereas glasses containing more will have a lower pitch. So, you can either put them in order of pitch or mix them up if you're feeling like being experimental. More info…
Bottle Top Castanets
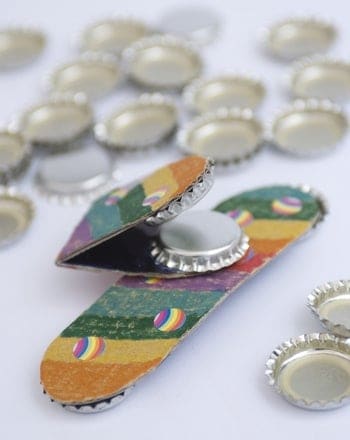
Start off by flattening a few metal bottle tops with a hammer (this first part is for adults only). Next, cut out two wide rectangular pieces of cardboard and fold both in half, so that they look like a duck's beak.
Then dab a bit of glue onto the jagged edge of the bottle tops and place onto both inside surfaces of the cardboard, so that they hit against each other when the card closes.
Now get the kids to join in by decorating the cardboard with paints, glitter, or sticks, whatever they like the best, and leave to dry. They can clap the castanets together to create interesting rhythms, or can even play two at a time using both hands if they feel extra creative! More info…
String Instruments
Rubber Band Guitar

Crafting a homemade guitar is slightly more complicated than the instruments we've talked about so far, but is just as fun and very rewarding.
You'll need the following materials before you start: a medium-sized plastic bucket or pot, some large elastic bands (in various widths), cardboard, a wooden stick, tape, and glue.
Wrap the elastic bands around the bucket, so that they run around the opening and the tapered end. Try to stick to an ascending order; from thinnest to thickest as you go, then tape them all in place, so they don't slip off during use.
Next cut a guitar shape out of a piece of cardboard, making sure to include a hole for the bucket and elastic bands to fit behind.
Paint the cardboard any color you like and leave it to dry. Next tape the bucket onto the back of the card, near the opening, and glue around the edges to secure in place.
Finally, attach the guitar's stick neck using plenty of tape and glue at the top of the cardboard cut-out. You can glue some beads or coins to the end of the neck to create a set of fake tuners. Strum and enjoy the music! More info…
Mini Lid Banjo

The mini banjo works in a similar way to the homemade guitar we mentioned above, as you'll be using elastic bands as strings.
To get started, get a jam jar lid and stretch four elastic bands around it. Try to use some thin and some thick, so that the sound varies when they are plucked.
Next, take some masking tape and secure the elastic bands in place, making sure they're an equal distance apart. Now get a craft stick or a recycled ice cream stick and decorated in funky colors. Stick it onto the back of the lid with glue and leave it to dry.
For extra detail, you can glue some sequins onto the end of the stick, so that they look like tuning pegs. Strum your banjo when everything's set and enjoy the music you create. More info…
Homemade Brass Instruments
Bracelet Bells

To make this instrument you will need some cotton pipe cleaners, three or four small bells, and some scissors.
To assemble, simply measure the width of the child's wrist and a half in pipe cleaner and feed the bells through the pipe. After placing each bell, twist the chenille to keep them in place about 1 cm apart. Then wrap the remaining length around the wrist and twist the two ends together to secure in place.
The kids can now shake their hands to rattle their homemade bracelet bells! More info…
Jingle Wand

To make a jingle wand, take five or six individual pipe cleaners and secure them together at one end and ¾ of the way up the stem, using elastic bands and some tape.
At the free end, attach a small bell to each of the individual chenille pipes and secure them by twisting a small knot into the pipe.
Kids can play around with this instrument by shaking it around and making the bells ring. More info…
Washer Chimes

To make your very own set of musical chimes, you'll need a stick or ruler, some string, some metal washers, glue, nail polish, and a spoon.
Tie a piece of string around each washer and then tie the other end around the stick. Make sure to attach the string at different points across the stick so they don't bunch up, and secure them into place with glue.
Next, get the kids to paint the washers with bright or sparkly nail varnish and leave to dry. Children can now use a metal spoon to hit the washers and create music. More info…
Homemade Wind Instruments
Card Kazoo
For this instrument, you will need a cardboard toilet roll tube, a rubber band, wax coated paper, some paint, and a hole punch.
Get the kids to decorate the toilet roll tube how they like it, leave it to dry, and then punch a hole about 1cm from the end of the cardboard.
Next, attach the wax paper over the other end of the tube and secure it into place with a rubber band. Warning – Do not glue this in place! It needs to vibrate a little to make a kazoo like sound. The kids can now blow into the open end of the tube to make music. More info…
Popsicle Harmonica

To make your very own popsicle harmonica, you'll need to get the kids to decorate two ice lolly sticks using a paint of their choice and leave it to dry.
Next, place a strip of paper between both sticks and secure together using a rubber band at each end. Now insert a toothpick in between both the rubber band rings, with one lying above the paper and the other below the paper.
Now you can blow into the harmonica or suck the air into it to make different sounds. Once you get used to playing, you can pinch the sticks together in different places to vary your notes! More info…
French Horn

Making a French horn is way easier than it looks, in fact, you only need the following three materials to make one: a piece of flexible piping about 56" in length, some craft shop pipe cleaners, and a funnel.
Fit the funnel into the pipe and secure with glue or tape (if the funnel is too big, you can cut some slits into the pipe to make it open up a little).
Next, curl the pipe around itself twice, so that the funnel and the mouthpiece are pointing upwards, twist pipe cleaners around the joints to keep everything in place. Blow into the hole and get tootin'! More info…
Viking Horns

To make your own Viking horn you'll need 3 cardboard loo roll tubes, a party horn, tape, and some white paint.
To start with, cut a line through the entire length of one of the cardboard rolls and cut the fringe off the party horn. Now curl the card around the outside of the party horn, so that it tapers out at the other end and secure it into place using masking tape.
Next, take the other two rolls and fold them at one end so that they fit inside each other. This way, you can connect all three tubes with masking tape.
Now, tear some plain paper into strips and cover the horn with them using water mixed with glue. Leave to dry and blow into the horn before battle commences! More info…
Note: If you're into pottery, you could sculpt one of these out of clay. You'd probably need a decent pottery wheel for beginners, but you'd end up with a way better and louder Viking horn.
Zampoñas (Panpipes)

If your kids fancy making a set of their very own panpipes, you'll need to get your hands on a few plastic straws (wider is better), some glue, a piece of card, and some scissors.
To begin, cut out a rectangular piece of cardboard and paint both sides in bright colors and glitter. Next, take eight straws and cut them into different lengths, glue or tape them onto the card rectangle according to ascending order of length.
Now you can play the panpipes by pointing the ends of the straws at the floor and blowing across the tops. More info…
Homemade Didgeridoo

To create your own didgeridoo, get a piece of PVC pipe (this is the sort of pipe you have connected to your sink for drinking water) or a cardboard tube and get the kids to paint and decorate it how they like.
Playing the didgeridoo can be slightly tricky as it requires some extra technique. To get a good sound they should relax their lips and blow a loose raspberry. They should eventually get a rumbling note from the instrument called the drone.
If your kids find this hard, make sure they aren't pressing the end against their lips too firmly or loosely as this can stop the sound from forming properly. More info
Pianos and Glockenspiels
Thumb Piano

Of course, it's quite hard to recreate an entire piano at home from scratch, but there's a way to do it on a smaller scale from a few simple materials.
This definitely requires an adult's assistance during its assembly, so make sure you're around to help the kids make this one. And once they're done playing with it, you can use it to hand your coats on!
Copper Glockenspiel

This is probably the most complicated instrument we've included in this article as it involves using a hammer and saw, so make sure you're around to carry out the difficult bits. Here's how you make it.
Summary
We hope you've enjoyed this read and have plenty of fresh ideas to inspire your kids with.
Remember, there's no right or wrong choice here, all are super fun to play and can be used to make interesting rhythms or melodies. But saying that, some of the instruments, for example, the balloon drums, Easter egg maracas, and bell shakers are far easier to make than others, so are probably most suited for younger children.
On the other hand, the copper pipe glockenspiel, thumb piano, and homemade guitar are great ways for slightly older kids to learn about music and DIY craftwork.
With so much choice here, you could even make several, get the children to create a band name (another fun activity), and before you know it, you might have the next child prodigy on your hands!
Happy music making! 🙂
Source: https://zinginstruments.com/homemade-musical-instruments/
0 Response to "How to Make Really Easy Homemade Instruments"
Post a Comment